Imagine downloading a new app that promises to simplify your workday. You sign up, poke around, and five minutes later close the thing for good. What happened? 80% of users have uninstalled an app because they didn't know how to use it. That’s not just a usability problem. It’s an onboarding problem because it also aligns with the fact that 90% of users think companies could do better with product-led onboarding.
Product-led onboarding is what happens when we stop relying on demos, sales calls, and welcome emails to get users hooked and instead let a seamless experience drive product adoption.
In this guide, we’ll unpack what product-led onboarding really means, how it differs from sales-led approaches, and how to build onboarding that sticks.
Free Customer Journey Map
Put yourself in your customers’ shoes to find the problems in your user experience (and uncover opportunities to solve them).
Download here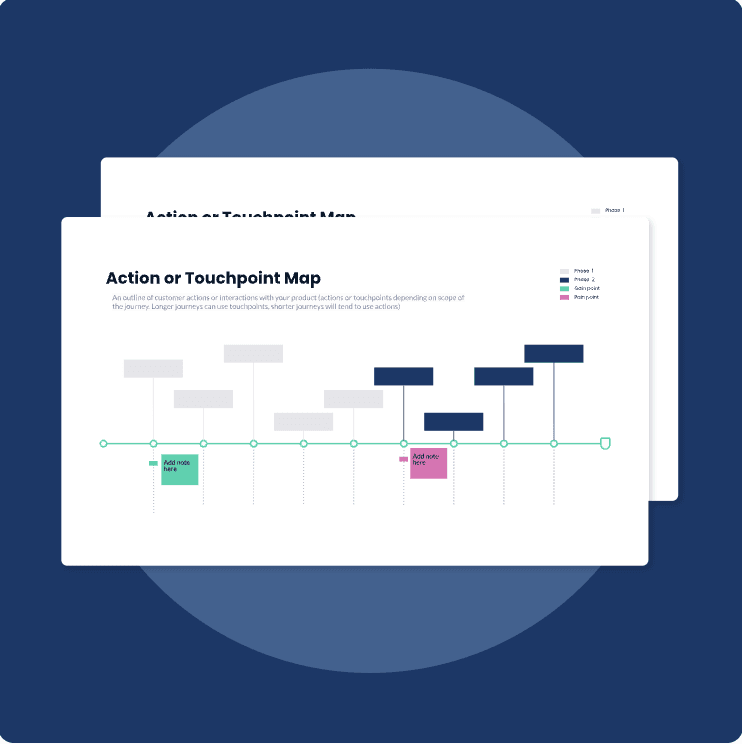
What Is Product-Led Onboarding?
Product-led onboarding is the process of guiding users to value through the product itself, without needing sales reps, long tutorials, or external hand-holding. It’s a user-first approach to onboarding where the product takes center stage in helping people understand how it works, why it matters, and how it fits into their workflow.
PLO doesn’t rely on one-off demos or email sequences. Instead, product-led onboarding creates a product experience that nudges users toward key actions. The goal is to help them reach their first “aha” moment in this critical user journey as quickly and intuitively as possible.
Product onboarding examples
Think about Google Maps. There’s no tutorial. You just open it, type a destination, and follow the prompts. The product anticipates your intent and shows you what to do next. This is onboarding without effort — clear, instant, and fully embedded in the experience. That’s one form of product-led onboarding.
Now take IKEA. You don’t just get a desk, you build it yourself. It takes effort. But that process helps you understand the product better, piece by piece. When you finish, you own it because you invested in making it work. It’s a different kind of product-led onboarding: more active, but still centered on the user learning through the product, not around it.
Some products need to feel like Google Maps. Others benefit from a bit of IKEA. The point is, product-led onboarding isn’t one-size-fits-all. Still, it always puts the product in charge of teaching, guiding, and delivering value.
This approach is especially critical for product-led growth (PLG) companies, where the product is not just the solution but the main driver of customer acquisition, activation, and user retention.
Here’s what makes product-led onboarding different from traditional onboarding:
It’s built into the product experience, not outside of it
It adapts to the user’s goals, behavior, and context
It delivers value early, not after a learning curve
It minimizes friction while encouraging exploration
When done right, product-led onboarding reduces time-to-value, improves product adoption, and boosts long-term retention, all without ever needing to say, “Let me show you how it works.” The product just does.
What Is the Product Onboarding Process?
The product onboarding process is the series of steps a user goes through to learn how to use your product and experience its value from the get-go. It starts the moment users sign up and continues until they’re confident using the product on their own.
In product-led organizations, this process is embedded inside the product through tooltips, progress bars, checklists, empty states, and personalized walkthroughs. It generally accelerates the path to value by showing, not telling.
What are the benefits of an efficient product onboarding process?
A strong product-led growth onboarding process directly impacts your growth, user retention, and revenue growth.

Here’s what a well-executed onboarding process can do:
Increase activation rates by helping users reach their first success faster
Reduce churn by giving users confidence and a clear path forward
Improve feature adoption through contextual education and timing
Lower support burden by answering questions inside the product
Strengthen user satisfaction and long-term loyalty
Create smoother product-led growth loops by turning new users into power users
Whether you're onboarding a free user, a trial account, or a paying customer, the same rule applies: value needs to be obvious and fast. The sooner people understand how your product fits into their life or workflow, the more likely they are to stick around.
How Product-Led Onboarding Compares to Other Approaches
Product-led onboarding is often used alongside terms like product-led growth or in contrast to more traditional onboarding methods.
But each of these approaches serves a different purpose. Understanding the difference helps you apply the right onboarding strategy for your product and user base.
Product-led onboarding vs. product-led growth
Product-led onboarding is a tactic. Product-led growth (PLG) is the broader product strategy.
Product-led growth means that the product drives acquisition, activation, and expansion. Product-led onboarding is one part of that engine. It’s what helps new users reach value quickly and without friction which in turn fuels the growth loop.

Product-led onboarding vs. sales-led onboarding
Sales-led onboarding focuses on human touchpoints — calls, demos, and guided walkthroughs with customer-facing teams. It’s common in enterprise product management where products are complex and contracts are large.
Product-led onboarding replaces that with in-app guidance, smart defaults, and personalized workflows. It scales better, requires less manual input, and empowers users to get started immediately.
Sales-led onboarding often looks like a “white glove” experience. Product-led onboarding feels more like self-checkout: fast, intuitive, and efficient—if done right.
Product-led onboarding vs. customer success-led onboarding
Customer success-led onboarding relies on dedicated teams to guide users post-signup. These teams may run onboarding webinars, send follow-up check-ins, or schedule training sessions. It’s more reactive and personalized but also more resource-intensive.
Product-led onboarding builds those success moments into the product. Instead of a customer success manager teaching someone how to use a feature, the product does it automatically.
Types of Product-Led Onboarding + Onboarding Examples
Not all product-led onboarding looks the same. The approach you choose depends on your product’s complexity, your user segments, and what “value” looks like in your context.
Below are the most common types, or styles, of product-led onboarding:
1. Self-serve onboarding
This is one of the classic PLG examples. Users sign up and are guided through the product using built-in cues, like tooltips, welcome modals, checklists, or progress bars.
It works best for:
Freemium monetization or trial-based products
Simple tools with fast time-to-value
High-volume, low-touch user bases
Product onboarding example:
Loom onboards users by walking them straight into a recording flow, with just-in-time tooltips and a minimal checklist. You start using the product within seconds, and you’re recording your first video before you even realize it’s “onboarding.”
2. Contextual onboarding
Instead of front-loading onboarding steps, this type delivers guidance in the moment. A tooltip appears when a user clicks on a new feature. A checklist updates based on user behavior. It’s dynamic and tailored to what the user is doing.
It works best for:
Products with many use cases or complex workflows
Users who onboard at their own pace
Feature-rich platforms
Example:
Notion doesn’t assume what you want to do when you sign up. Instead, it waits for you to take an action, like creating a new page or selecting a template. Then they show suggestions relevant to that action. It adapts as you explore.
3. Persona-based onboarding
The product experience changes based on who the user is and what they’re trying to accomplish. Onboarding flows might differ for marketers vs.. developers, or individual contributors vs.. team leads.
It works best for:
Products with diverse user roles or industries
Tools that serve cross-functional teams
B2B SaaS platforms
Example:
Hotjar asks new users what role they’re in and what they want to achieve — like “understand user behavior” or “optimize conversion.” Based on that input, the onboarding flow changes, showing only the most relevant setup steps and tools.
4. Progressive onboarding
Progressive onboarding introduces new features gradually, not all at once. After the user completes the core setup, new value layers are unlocked over time. It’s designed to avoid overwhelming users early on.
It works best for:
Complex platforms with steep learning curves
Long-term user retention and feature discovery
Products with multiple use tiers
Example:
ClickUp starts by onboarding you into basic task creation. Once you’re comfortable, it introduces views, automations, time tracking, and more advanced tools — one at a time. You grow into the product instead of getting hit with everything up front.
5. Embedded support onboarding
This approach integrates self-help resources, like searchable docs, tutorials, or chat support, directly into the product. Users stay inside the app while learning and troubleshooting.
It works best for:
Technical products or developer tools
Users who prefer exploring on their own
Reducing dependency on customer support
Example:
Webflow embeds content right into the interface. When you’re designing a page and get stuck, you can click “Help” and see video tutorials and docs without leaving the builder. You can figure things out inside the tool or through their online community.
Steps and Best Practices for Product-Led Onboarding
This section will walk through the essential steps to design and implement a product-led onboarding experience that delivers real value. Each step includes best practices, relevant product onboarding frameworks, and examples of product onboarding tools you can use to bring it to life.
1. Understand your users' goals
You can’t guide someone toward success if you don’t know what success looks like for them. That’s why great product-led onboarding starts before a single tooltip is written. It begins with a deep understanding of user intent.
Not all users sign up for the same reason. Some want to solve a problem immediately. Others are exploring. Some are technical. Others aren’t. If you treat them all the same, your onboarding will feel too vague for everyone and helpful to no one.
How to do it well:
Ask a short, purposeful question at sign-up: “What are you hoping to accomplish today?” or “What best describes your role?”
Use that answer to segment users and tailor their onboarding flow
Map out common use cases and identify what “success” looks like for each one
When users sign up for Hotjar, they’re asked what they want to achieve—like understanding user behavior or improving conversions. Based on the answer, they get a custom onboarding path that highlights only the features relevant to that goal.
Product onboarding tools that help:
2. Define your onboarding success metric
It’s easy to fall into the trap of tracking how many users complete a checklist or finish a product tour. But those are vanity metrics. What you actually want to measure is the moment when a user experiences real product value — their aha moment.
This moment is your onboarding North Star. It tells you whether your onboarding is working or not. And it gives your product team a clear target to optimize around.
How to define it:
Analyze your most successful users and reverse-engineer what they did early on
Look for the first meaningful action that correlates with user retention or expansion
Choose one activation event that clearly signals value—for example, sending the first email, uploading the first file, or inviting a teammate
Slack defines user activation as a team sending 2,000 messages. But onboarding doesn’t focus on that number—it focuses on getting teams to send their first 5–10 messages quickly, because that behavior sets the foundation for long-term success.
Tools that help:
Amplitude or Mixpanel: For identifying and tracking activation events
Segment: To unify user data across product and marketing touchpoints
InnerTrends: For discovering the behaviors that drive conversion
3. Use a proven framework to map your onboarding flow
Once you understand what users want and what success looks like, the next step is to design a flow that gets them there — smoothly, quickly, and with minimal friction. This is where onboarding frameworks come into play.
One of the most useful mental models for product-led onboarding is the Bowling Alley Framework, coined by Ramli John.
It’s simple but powerful: picture your user as the bowling ball, their goal as the pins, and your onboarding flow as the lane. The job of onboarding is to guide them toward success while preventing “gutters” — distractions, friction, or confusion that cause drop-off.
How to apply the Bowling Alley Framework:
Identify the “strike” moment (your activation event)
Map out the shortest possible path to get there
Add “bumpers” like empty states, tooltips, and guided actions to keep users on track
Build in recovery paths if users stall or go off course (e.g., email nudges, live chat prompts)
Dropbox uses this framework implicitly. The moment of value is when users upload and sync their first file. So the onboarding flow includes a prominent CTA, a visual guide showing how to upload, and a checklist to reinforce next steps.
Tools that help:
Appcues, Userpilot, or Userflow: To create no-code onboarding flows with visual guides
Productboard or Miro: To map out your user journey and onboarding structure
4. Create in-product guidance tailored to user context
A common mistake in onboarding is dumping everything on users upfront—a long product tour, multiple pop-ups, or a wall of tooltips. Most people won’t read it. Some will bounce. The smarter move is to guide users only when and where they need help. That’s contextual onboarding.
This means the onboarding adapts based on user actions, roles, or where they are in the customer journey. You don’t explain every feature—just the one they’re likely to need next.
Best practices for contextual onboarding:
Trigger tooltips or messages based on behavior (e.g., only show help when a user clicks a new tab)
Use empty states and first-use moments as learning opportunities
Personalize language and tone based on user role or intent
Notion does this beautifully. If a user opens a blank page, they see subtle prompts suggesting what to create—like a task list or doc. But if they import a template, those tips disappear. The onboarding experience adjusts in real time to the context.
Tools that help:
Chameleon or Pendo: For smart, event-triggered onboarding messages
WalkMe or Whatfix: For complex enterprise-grade contextual flows
Mixpanel or Heap: To set up the behavioral triggers and track what works
All set! Let me know if you’d like a master list of all tools mentioned throughout the article.
5. Use onboarding checklists and progress indicators
People love a sense of progress. That’s why onboarding checklists work so well, they create clarity, reduce overwhelm, and give users a reason to keep going. When designed right, they serve as a roadmap to value.
But not all checklists are helpful. If they’re too long, too rigid, or full of unnecessary steps, they feel like homework. The best ones are short, focused, and tied directly to user goals not just product features.
Best practices for effective onboarding checklists:
Include only 3–5 key actions that lead to activation
Make it feel optional, but rewarding, completion should unlock something meaningful
Pair each step with clear instructions or inline guidance
Grammarly uses a simple onboarding checklist to get users into the flow of writing. One step prompts users to install the browser extension. Another asks them to write a sentence. Each action builds toward the core value—better writing in real time.
Tools that help:
Userpilot, Appcues, or HelpHero: For no-code checklists and progress indicators
Userlist or Customer.io: To follow up with email nudges if users don’t complete key steps
6. Support frictionless self-serve help
Even the best onboarding flows can’t predict every question. That’s where embedded support comes in. Instead of sending users to an external help center, bring the answers into the product.
This doesn’t just reduce friction, it builds trust. When users hit a roadblock, they can find what they need and keep moving forward, without breaking flow.
Best practices for embedded support:
Add tooltips that link directly to relevant help docs
Use smart search inside your help widget so users can find answers fast
Offer a way to contact support if self-serve options don’t solve the problem
Webflow integrates searchable documentation directly into its UI. When users get stuck while designing, they can click a help icon and find videos, articles, or tutorials without leaving the editor. It keeps them in the zone while removing friction.
Tools that help:
Intercom, Zendesk, or Help Scout: For in-app help centers and chat
Stonly or Scribe: For step-by-step interactive guides embedded in product
DocSearch by Algolia: For lightning-fast in-app search across your documentation
7. Test, measure, and iterate
No onboarding flow is perfect out of the gate. Even well-designed experiences need tuning as your product evolves, new features launch, and user expectations shift. That’s why iterative testing and iteration in general is a core part of product-led onboarding.
The goal here isn’t just to improve aesthetics—it’s to identify friction points, reduce drop-off, and make onboarding more efficient over time.
Best practices for optimizing onboarding:
Use funnel analytics to track drop-off between onboarding steps
Watch session replays to understand where users get stuck
Run A/B tests to compare onboarding variations
Ask users for feedback at key moments, especially after they’ve activated
Miro regularly tests different onboarding flows for new templates, team invites, and workspace setup. Based on behavioral data and qualitative feedback, they tweak messaging, reorder steps, or add/removal prompts. Small changes often lead to big improvements in activation.
Tools that help:
Hotjar, FullStory, or Smartlook: For heatmaps, session replays, and user insights
Split.io, Optimizely, or Google Optimize: For A/B testing onboarding elements
Survicate, Refiner, or Typeform: For collecting qualitative feedback at the right time
Mixpanel, Amplitude, or Heap: For tracking onboarding funnels and success metrics
Product Onboarding Frameworks
Several frameworks can help you design flows that guide users to value with clarity and intention. Whether you're mapping a first-time user journey or optimizing an existing onboarding experience, these models offer a practical way to structure your thinking.
The Bowling Alley Framework
The Bowling Alley Framework, popularized by Ramli John, offers one of the simplest ways to visualize onboarding.
It positions the user as the bowling ball, the desired product outcome as the pins, and all the onboarding elements — checklists, tooltips, modals, and nudges — as the bumpers keeping the ball from veering off course.
This framework is especially useful because it focuses on minimizing friction while reinforcing the key steps that lead to activation. The idea is to guide users just enough to avoid confusion or drop-off. Once users complete a core action (the “strike”), they’re more likely to return and continue exploring.
To apply this framework in practice, you need to:
Define what a “strike” looks like — this is your activation moment
Map the shortest path from sign-up to that outcome
Add lightweight, contextual bumpers that support the user on that path
It’s a flexible model that works well for both self-serve SaaS tools and more complex products that require layered onboarding experiences.
AARRR (Pirate Metrics)
Originally developed by Dave McClure, the AARRR framework, also known as Pirate Metrics, is a funnel-based model that maps the critical user journey from first touch to monetization and advocacy. While not specific to onboarding, it’s incredibly useful for placing onboarding within the bigger picture of product-led growth.
AARRR stands for:
Acquisition: How users find your product
Activation: The user’s first successful experience (this is where onboarding lives)
Retention: Keeping users engaged and coming back
Referral: Getting users to invite others
Revenue: Turning engagement into paying customers
In the context of onboarding, the key focus is Activation. That’s the moment a user experiences real value—like uploading a file, sending a message, or publishing their first project.
By defining this milestone and reverse-engineering the path to get there, you can design onboarding flows that are laser-focused on what truly matters.
The 3 A’s of Onboarding: Awareness, Activation, Adoption
The 3 A’s framework breaks the onboarding experience into three sequential stages, awareness, activation, and product adoption, each representing a psychological milestone in the user’s journey. While it’s a simple model, it’s powerful in helping product teams map what kind of support users need at each step.
Awareness is the first stage, where users understand what your product does and how it fits into their lives or workflow. This often begins on your landing page or during the first login experience.
Activation is the moment a user first experiences value. This is where traditional onboarding tactics come into play — product tours, contextual nudges, and quick-start templates designed to deliver that early win. Your goal is to reduce time-to-value here.
Adoption happens when the user begins to rely on your product regularly. This stage often requires more advanced guidance, surfacing deeper features and encouraging habit-forming behaviors through progressive onboarding.
What makes this framework useful is how it forces you to think in stages, not just a single “onboarding flow.”
Fogg Behavior Model
Developed by Stanford researcher BJ Fogg, the Fogg Behavior Model explains that any action happens only when three things are present — motivation, ability, and a prompt. If even one of those is missing, the behavior doesn’t happen.
In onboarding, this framework helps explain why even well-designed user flows can fail. A tooltip may appear (prompt), but if the user doesn’t understand why they should care (motivation) or if the task is too complex (low ability), they’ll ignore it.
The model looks like this:
Behavior = Motivation × Ability × Prompt
It’s particularly helpful when diagnosing drop-off points. If users stall after signing up, ask:
Were they properly motivated? Did we explain the value clearly?
Was the task easy to complete? Could they do it without effort or support?
Did we prompt them at the right moment?
The Fogg Model encourages product teams to make small changes with big impact. This can mean simplifying a setup step, rewording a CTA, or shifting when a prompt appears. It’s a behavioral lens that pairs perfectly with micro-onboarding patterns and just-in-time learning.
Why Product-Led Onboarding Is the Key to Long-Term Growth
Product-led onboarding is huge part of a growth strategy. It’s what turns curious visitors into confident users and transforms activation into habit. The best product-led organizations teach users how to succeed without ever saying, “Let me show you how this works.” Their product does its best to do the showing, and their onboarding feels like progress.
The first few minutes inside your product don’t just set the tone. They determine whether a user becomes a customer, an advocate, or a bounce.
So start there. Start with onboarding. And make it count.
Source 1: Wyzowl Onboarding User Retention Data
User Flow Template
Include design early in the Product process with these two user flow diagram templates.
Get the template
Updated: October 9, 2025